Naturally Lindsay

  • Home
  • About
    • Sponsor
    • As Seen On
    • Disclaimer
  • Recipes
  • Health Coaching
  • Contact Me
  • Essential Oil Talk

Author: Neil Fairweather

Fitness Friday: Training for the Helvetia Half Marathon

June 12, 2015 by Neil Fairweather 4 Comments

Tomorrow’s the big day. It’s the day I’ve been training for for the past 2 and a half months and the race I’ve been meaning to run the past 2 and a half years. I will be running the Helvetia Half Marathon in Hillsboro, OR.

Since having kids and moving to Portland, I haven’t taken running or my fitness in general as serious as I should. This will be the third half marathon I’ve signed up for since moving to Portland and only the second one I will have run and the first one I have trained appropriately for.

Aside from being conveniently located near our house, the Helvetia Half Marathon offers a great atmosphere, starting and finishing the race in a minor league baseball stadium, features beautiful views of Washington County’s countryside, and one hell of an elevation profile.

Elevation Profile

In years past, I’ve been guilty of skipping the hill run portions of my training plans. Race day would come and I’d find myself using up all of my energy or not even being capable of running up “unexpected” hills on the course. However, that all changed this year. This year, I signed up for the Portland Fit marathon training program. The Helvetia Half was one of the goals on their marathon training plan and promised to provide me with the knowledge, camaraderie, and group setting that I needed to motivate me in my training.

Enjoying a Cold Brew After My First Half Marathon

Enjoying a Cold Brew After My First Half Marathon

The format of the Portland Fit training program is to provide you with the information, training schedule and community to help you run your first or fifteenth marathon. They provide you with a schedule of training runs to do during the week and a coordinated group run on the weekend for your long runs. The long runs alternate between longer, hillier runs and shorter, faster, flatter runs with easy runs, tempo runs, hill runs and interval training sprinkled in between.

Rocking out at the Montreal Rock 'n' Roll Half Marathon

Rocking out at the Montreal Rock ‘n’ Roll Half Marathon

The participants are broken up into color groups by pace and the start times are staggered so that every group finishes around the same time so they have an equal opportunity to attend the informational seminars at the end. I chose to run in the red group which is the 10-12 minute pace group. While I have typically run anywhere from 8:45-9:30 pace, I figured after a couple years of inconsistent running and exercising that it might be a bit more realistic to train around a 10 mile pace. I think making that choice has helped me to train smarter and more efficiently and be able to run the entirety of my long runs and tackle the hillier runs better as well. The group is made up of people with a variety of experience, background, goals and abilities. The one thing they do have in common is being a positive and supportive group. There’s a great emphasis on supporting each other and never a feeling of being judged for being slower. And it shows in the teams motto, “We’re red and we’re proud.”

Bridge to Brews - post kids race

April 2015 – Bridge to Brews 8k

I’m looking forward to this race more than any other aside from maybe my first half marathon. I don’t have any lofty goals or dreams of PRs, I’ll just be happy to finish it knowing I’ve done my best and dedicated as much of myself as I could to training for the race.

Posted in: Fitness Friday Tagged: running

{Hubz Post} Iced Coffee: Doing it Japanese

August 24, 2011 by Neil Fairweather 2 Comments

I had spent the first 28 or so years of my life absolutely certain that I was not a coffee drinker and that I would never be a coffee drinker.  I didn’t like hot drinks and I had never had a pleasant tasting coffee.  It was odd, because I did like chocolate covered coffee beans, coffee ice cream and other things with coffee flavour, but could never bring myself to like coffee.  That is, until I attended a Green Mountain Coffee tasting event with Lindsay.  It turns out, I had just never had a good cup of coffee in my life.  Apparently, Tim Hortons and Irving convenience store coffees and coffee drinks were not the best that coffee had to offer.  Now, at 30, I find myself to have become a coffee snob and somewhat of a connoisseur.

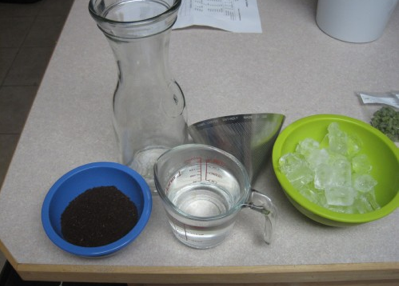
There’s nothing I love better in the morning than a nice cup of coffee  ( the darker the better! ).  With this hot summer though, hot coffee isn’t always going to hit the spot and that’s where iced coffee comes into play.  Having grown tired of over-spending on iced coffee that I could never guarantee wasn’t just yesterday’s leftovers thrown in the fridge or something entirely overcooked and done too strong, I needed to find out how to make a good cup of iced coffee on the cheap.  I had made cold pressed iced coffee before with a french press, but we are without a french press and that is an overnight/all day process as it is.  After reading some articles and blogs online, I stumbled across the Japanese method of brewing iced coffee.  This method was done in minutes, doesn’t require any fancy equipment and – most importantly – makes a delicious cup of iced coffee.  It’s been a go to of mine as of late and I decided to document the process one night while I was brewing my latest batch of home brewed beer.  Lindsay asked me to share with you, so here is the process in words and pictures.

What You’ll Need

  • A suitable glass container ( I’ve used a wine carafe and water pitcher, but the Chemex seems to be the most popular choice amongst coffee bloggers)
  • A metal conical coffee filter
  • Equal amount ice to boiling water (1 oz weight of ice is equal to 1 fl oz of water)
  • 1.5-1.8 grams of coarse ground coffee to total fluid oz of water (depending on how strong you like it!)

How You Make It

  1. If you have a grinder, grind your beans on the coarse setting.
  2. Boil some water for the coffee
  3. Weigh out your ice and place it in the glass container.
  4. Measure the water.
  5. Place the filter with the ground coffee on the top of the container.
  6. Slowly pour the boiling water through the grinds in the container.
  7. Make your favourite additions to the iced coffee and enjoy! (I love mine black)

When you are done you will have a great iced coffee with a delicious rich and smooth flavour.  Melting the ice with the coffee allows for the iced coffee to be cooled immediately and without weakening or diluting the brew.  Also, with the coffee being cooled immediately, it prevents the oxidization and loss of flavour that you would have if you allowed a normally brewed pot of coffee to chill over a couple of hours.  The coffee should keep a good flavour for a day or so after you brew it, if you decide to brew a bigger batch.

Posted in: Guest Post, Recipes Tagged: coffee, delicious, hubz, iced coffee

CSA: Celeriac Mash

November 19, 2009 by Neil Fairweather 5 Comments
We did not eat the cat!

We did not eat the cat!

Last night marked the beginning of week two for our CSA “Winter Food Basket”. Every two weeks we get a basket full of assorted winter/fall veggies from many different local farms. As we began the second week, we had mostly root vegetables and squash left as greens and other veggies obviously don’t last as long.

So, last night was a fairly quick and easy dinner made (mostly) out of our CSA items. We roasted up some delicata squash rings (although, these delicata are different than ones we’ve had in the past. more stringy like spaghetti squash) and a Celeriac and Potato Mash. We were originally thinking celeriac soup, but were more in the mood for a quick meal. So, Lindsay whipped this up while I did some dishes.

In addition to the veggies, we had some “light life ginger teriyaki tempehtations”. I found them to be quite dull. The flavor was weak and the tempeh was dried out and definitely of a lower grade than we are used to.

Below, is the recipe for the mash:

Celeriac Potato Mash

2 medium sized celeriac (celery root), peeled and diced
2 large potatoes, peeled and diced
¼ cup sour supreme
¼ cup nondairy milk
2 tablespoons vegan margarine
2 heading tablespoons nutritional yeast
Salt and Pepper to taste

1.Boil the potatoes and celeriac until fork tender.
2.Drain the potatoes and celeriac and add back to the pot.
3.Mash in the sour supreme, nondairy milk, margarine and nutritional yeast. Mash together- I like to keep it a little more chunky but if you like it whipped you’d like.
4.Season with salt and pepper to taste.

Posted in: Recipes Tagged: celeriac, CSA, light life, potato, Recipes, squash, tempeh

Kimchi Fried Brown Rice

November 11, 2009 by Neil Fairweather 6 Comments

So, I don’t know about you guys, but I really love Korean food, kimchi especially. The issue I usually have with Korean food is that a lot of it has fish sauce. We recently received a bottle of fermented, raw kimchi from for review, so I decided to put it to good use by making some Kimchi Fried brown rice.

IMG_5144

I decided to substitute the scrambled egg you typically find in Asian fried rice dishes with crumbled tofu and the meat you may typically find with white mushrooms.

2-3 cups of cooked rice (I made mine in a rice cooker)
1/2 C to 1 C of Kimchi
1/2 onion
4-5 small mushrooms
1 clove garlic
1 T veg oil/olive oil
2 T soy sauce
1/4 block of tofu
1-2 T Sesame Oil
S+P to taste

1. Slice the mushrooms, mince the garlic and chop the onions into small pieces
2. Heat the veggie oil in a wok/skillet and sautee the mushrooms, garlic and onions for a couple minutes.
3. Crumble the tofu into the mixture and add the soy sauce and some pepper.
4. Add the kimchi to the pan and warm it up.
5. Add the cooked rice and stir in the mixture of the tofus and vegetables.
6. Once warmed, add sesame oil to taste.
7. Add S+P to taste.
8. Add fresh kimchi to top as garnish.
9. Enjoy!!

Posted in: Recipes, Review Tagged: cooked, kimchi, korean

Review: Kathy's Krackers

November 3, 2009 by Neil Fairweather 7 Comments

Kathy’s Krackers – Kracker’s You Krave

Yummy yummy raw crackers!

Yummy yummy raw crackers!

This summer, Lindsay and I made an effort to eat a high raw diet. Part of the fun was experiencing different raw products. From raw cookies to raw crackers and raw nut mixes, there was so many different things to try.

Kathy’s Krackers are a healthy snack made of flaxseed and are raw and gluten free as well.

Kathy’s Kracker’s was kind enough to send us a sample of all three of the flavours they offer:

  • Salsa – The salsa crakers were my favourite by far. They captured the typical flavours of salsa perfectly. They had a very good spice level as well. They were spicy, but not unbearable by any means. We ate them plain, but website suggests adding avocado and other vegetables and I think this would compliment the flavours found in the cracker perfectly, I wish I had thought of that!
  • Savoury – These crackers are flavoured with bell pepper, tomatoes and garlic and have a very well balanced taste. I enjoyed these quite a bit. We ate these on their own, but I imagine they would be very good with hummus or a raw dip.
  • Apple & Cinnamon – If you are looking for a sweet snack, this is a great choice. They are sweetened with Stevia and have a very natural apple taste. It’s refreshing to have something that’s supposed to be apple flavoured that isn’t overly tart or artificial tasting. I think these would be a hit in school lunches as well.

These are a great snack for when you are on the go or when you are looking to build a more complete snack (as in the avacado and vegetables combo with the salsa crackers) as well. I would definitely recommend picking up a pack if you can!

Being made of all natural, raw ingredients there are plenty of health benefits that come along with eating Kathy’s Krackers. These can be found on the Kathy’s Krackers website. Health Benifits

You can also view where these snacks are available here or order online

Posted in: Review Tagged: crackers, kathy's krackers, product, raw

VEGAN MOFO #5: Product Review: Fruitabu Smooshed Fruit Twirls

October 5, 2009 by Neil Fairweather 1 Comment
Organic Smooshed Fruit

Organic Smooshed Fruit

First off, I will introduce myself to those who may not be familiar with me.  I am the “lover” from “Cooking for a Vegan Lover, often referred to as the hubby or hubz.  I’ve decided to help by lending a hand in writing reviews for products or restaurants for the blog.  I may even write a summary of what we’ve cooked for the night on those rare occasions that I am the one cooking dinner.

I was always a huge fan of fruit roll ups, fruit by the foot and that “fruit leather” when I was younger.  So, it’s fitting that my first post to this incarnation of Cooking for a Vegan Lover is a review of FruitaBu’s Organic Smooshed Fruit Fruit Twirls.

Fruitabu was kind enough to send us coupons for two free boxes of their products.  I decided to go with the Strawberry fruit twirls to pack in my lunch or bring on our trips with us as snacks.  The fruit twirls had a great taste.  They weren’t too sweet and tasted like real fruit.  The consistency was just what you’d expect for a “smooshed fruit” snack.  It was soft and chewy and did not stick to your teeth like those chewy, plasticy “fruit flavoured” snacks that I enjoyed as a kid.

I am also still a kid at heart, so I definitely enjoyed eating the snack bite by bite as I unrolled it.

Having never had these before, I can definitely say that I will be buying them in the future to bring on my lunches or for hikes.  These are a much healthier alternative as they have no added sugar, contain 1 whole serving of fruit and have just 80 calories.

Check our their website for more information on their products including nutriotional information and information on the company.

http://fruitabu.com/

Posted in: VeganMofo Tagged: Review, swag, VeganMofo

I’m a Certified Holistic Health Coach, Essential Oil Lover, Recipe Creator, Mamax2, Aspiring Runner & barre lover blogging my way through life. Contact Me: Lindsay@runningwithtongs.com

What’s New?

  • Vegan Banana Bread Donuts (GF)
  • 2019 Amazon Plus-Size Swimsuit Haul + Straight Size Options
  • Broadway in Portland | Aladdin
  • [Recipe] Creamy Kale Salad featuring Manitoba Harvest Hemp Hearts
  • [Recipe] Tofu Fresh Rolls with Creamy Peanut Sauce

Getting To Know Essential Oils

Curious about the benefits how to incorporate essential oils into your life? Contact Me!

Categories

Discover the best vegan products

Archives

Disclaimer

The information on this blog is for information purposes only and no guarantees are made concerning the accuracy, reliability, and completeness of that information. The blogger behind this website accepts no responsibilities for errors or omissions on the site. Remember that any advice, tips, or recommendations you receive from this blog are not to be substituted for professional advice, please consult with a medical professional before starting any new exercise or diet plans. Visitors should take action based on the information provided at their own risk, as the blog owner is not responsible for any losses, damages, or injuries, that occur as a result.

Networks

FitFluential Is Fitness Found
Girls Gone Sporty Ambassador Badge

Copyright © 2025 Naturally Lindsay.

Lifestyle WordPress Theme by themehit.com